
How to Prevent Bricked ECU Flash: 7 Critical Steps
Table of Contents
- Why ECU Flashes Fail and How to Prevent Bricked ECU Flash
- ECU Flash Power Supply Requirements: Voltage, Battery, and Stability
- Step-by-Step Pre-Flash Checklist to Prevent a Bricked ECU Flash
- ECU Tuning Best Practices: Calibration Files, Checksums, and Write Modes
- How to Recover a Bricked ECU: Boot Mode vs. OBDII vs. Bench Recovery
- Hardware Requirements for a Stable ECU Flash
- Frequently Asked Questions
Last Updated: September 30, 2026
Why ECU Flashes Fail and How to Prevent Bricked ECU Flash
A bricked ECU flash turns your car into an expensive paperweight: the ECU stops responding, the dash lights up, and the vehicle won't start. This guide from H&A Midwest explains why flashes fail and how to prevent it.
Identifying a Bricked ECU vs. Communication Error
A bricked ECU is dead; a communication error is a temporary handshake failure. Mixing them up costs money.
How to tell them apart:
- Try to reconnect. If the tool reads the ECU, it's a communication error.
- If the tool can't find the ECU at all, the flash likely failed.
- Check for a no-start condition combined with no scan tool response.
ECU Flash Power Supply Requirements: Voltage, Battery, and Stability
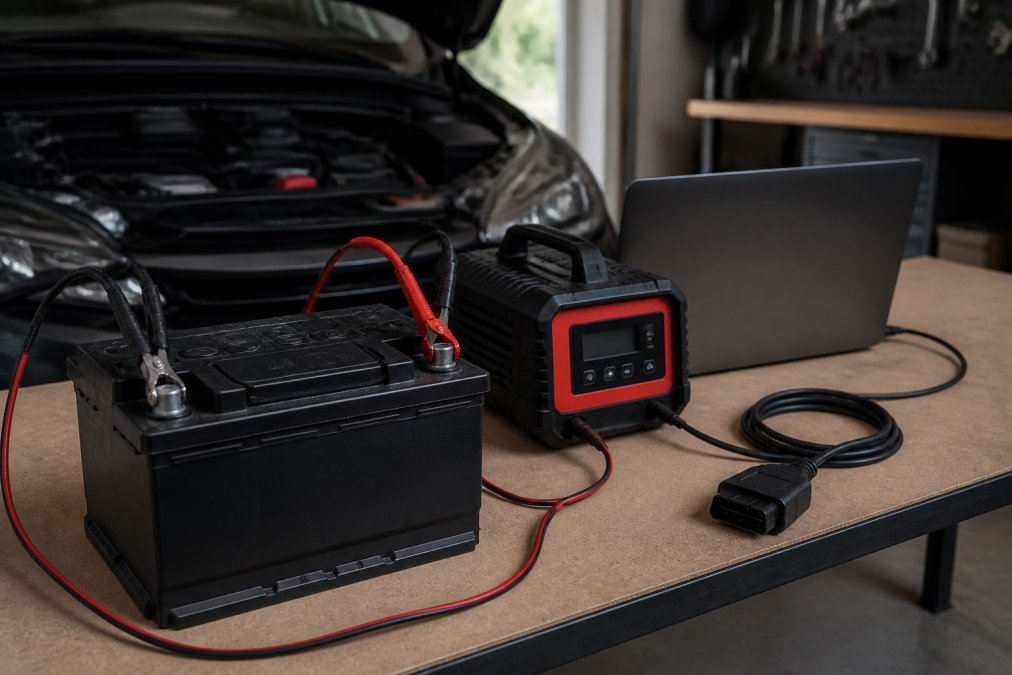
Voltage is the number one killer of ECU flashes. A stable power supply matters more than almost any other factor.
Battery Voltage Thresholds and Laptop Power Settings
Keep the battery above 12.5 volts before starting, and connect a smart charger holding a steady 13.5 to 14 volts throughout. Laptop settings matter too: sleep or hibernate mid-flash cuts the connection and strands the ECU.
Set these before you begin:
- Disable sleep, hibernate, and screen dimming
- Plug the laptop into mains power
- Turn off Wi-Fi and Bluetooth to reduce interference
- Close every other program
Step-by-Step Pre-Flash Checklist to Prevent a Bricked ECU Flash
This checklist is the best defense against a bricked ECU flash. Run it every time, even on a familiar car, and work through it in order, if any step fails, stop and fix it first.
Phase 1: Vehicle and File Verification
-
Confirm your Make, Year, Model, and Engine code match the tune file exactly. A VIN-specific file is built for your exact vehicle; a generic file risks an
Error_Invalid_Filerejection or a bad write that leaves the ECU non-bootable. - Verify the calibration file checksum before you start. If the checksum doesn't match, the ECU rejects the data or runs poorly. Most tuning software validates automatically, but confirm manually if the option exists.
- Back up the original ECU ROM before writing anything. This backup is your recovery lifeline. Without it, a failed flash may require a full bench recovery or a replacement ECU.
Phase 2: Power and Hardware Readiness
- Charge the battery and connect a smart charger. Stay above 12.5 volts before starting and hold 13.5 to 14 volts throughout, since a mid-write drop can cut power.
- Check the OBDII interface cable for damage and a firm fit. A loose or damaged cable is a leading cause of communication errors that escalate into failed writes if the connection drops during the erase step.
- Use a quality OBDII interface cable built for high-speed communication. Cheap cables can introduce voltage drops or data corruption. The FlashZilla Pro and v3 hardware from H&A Midwest are matched to your ECU and bundled with every tune.
Phase 3: Laptop and Software Configuration
- Update your flashing software to the latest version. Software bugs in older versions can cause write failures. Check the manufacturer's release notes for known issues with your ECU type.
- Disable all laptop sleep and power-saving settings. A laptop that sleeps mid-flash strands the ECU. Disable sleep, hibernate, and screen dimming; plug into mains power; turn off Wi-Fi and Bluetooth; close other programs.
Phase 4: Flash Execution
- Keep the ignition on and do not touch the key during the write. Any interruption to the ignition circuit can abort the flash. Some vehicles require a specific key position; confirm this in your tuning software's instructions.
- Monitor voltage during the flash if your charger has a display. If voltage drops below 13 volts, abort the flash if the software allows a safe cancel. Otherwise, note the voltage for troubleshooting.
What to Do If a Step Fails
If any step fails, do not proceed. For example:
- Battery below 12.5V: Charge longer or replace the battery. Do not attempt a flash on a weak battery.
- Checksum mismatch: Re-download the file from a trusted source. Do not force the write.
- Cable damage: Replace the cable. A temporary fix like taping a frayed wire can fail mid-flash.
- Software update unavailable: Check for known bugs with your ECU. If none, proceed with caution and monitor closely.
| Step | What to Check | Why It Matters |
|---|---|---|
| 1 | VIN-specific file match | Wrong file = no start |
| 2 | Checksum validation | Catches data corruption |
| 3 | ROM backup | Enables recovery |
| 4 | Battery above 12.5V | Prevents voltage drop |
| 5 | Interface cable condition | Stops communication errors |
| 6 | Cable quality | Avoids data corruption |
| 7 | Software version | Avoids write bugs |
| 8 | Laptop power settings | Prevents mid-flash sleep |
| 9 | Ignition stability | Prevents abort |
| 10 | Voltage monitoring | Early warning of drop |
ECU Tuning Best Practices: Calibration Files, Checksums, and Write Modes
File quality decides whether your flash succeeds; a bad calibration file bricks an ECU faster than a weak battery. Two write modes exist: "write calibration" updates only tune tables, while "write entire" rewrites the full ROM including the boot sector. If the boot sector fails during a "write entire," the ECU cannot boot, a true brick.
VIN-Specific Files and Checksum Validation
This is where H&A Midwest differs from buying a loose file online. Every Audi A3 2.0 TFSI EA8113 tune ships with the FlashZilla handheld device, so the hardware and the file are matched to your car from the start.
How to Recover a Bricked ECU: Boot Mode vs. OBDII vs. Bench Recovery
Recovery depends on how badly the ECU is bricked: some come back through the OBDII port, others need boot mode or a full bench recovery. Try the easiest method first and work up only if it fails.
OBDII Recovery: When the ECU Still Responds
If the ECU still communicates with your diagnostic tool, try OBDII recovery first, the least invasive method.
Step-by-step:
- Ensure the battery is fully charged and connect a smart charger.
- Reconnect your OBDII interface cable and confirm a firm fit.
- Open your flashing software and attempt to read the ECU. If it reads, the ECU is alive.
- If the read succeeds, attempt to reflash with a known-good, VIN-specific file.
- Monitor voltage throughout. If voltage drops below 13V, abort if possible.
Boot Mode Recovery: Forcing the ECU into Recovery Mode
Boot mode is a hardware-level recovery that forces the ECU into a minimal communication state, bypassing corrupted firmware. It's often the only way to recover an ECU that no longer boots.
What you need:
- The correct pinout for your ECU (available in service manuals or from tuning hardware vendors).
- A bench harness or a way to power the ECU on a bench.
- A steady power supply (13.5-14V).
- A laptop with the flashing software and the correct boot mode protocol.
Step-by-step (general procedure):
- Remove the ECU from the vehicle if required. Some ECUs can be put into boot mode in-car, but bench is safer.
- Identify the boot pin and ground pin from your ECU's pinout. Do not guess.
- Connect the ECU to a stable power supply on the bench.
- Short the boot pin to ground (or apply the specified voltage) as per the pinout instructions. This forces the ECU into boot mode.
- Power on the ECU and attempt to connect with your flashing software in boot mode.
- If connection succeeds, write a known-good full ROM (including boot sector) using the software's boot mode recovery function.
- After a successful write, remove the boot pin connection and power cycle the ECU.
Critical cautions:
- Shorting the wrong pin can permanently damage the ECU. If you're unsure of the pinout, stop and get help.
- Boot mode recovery often requires a full "write entire" to restore the boot sector. Ensure your file is complete and checksum-valid.
- Some ECUs require a specific sequence of power and pin states. Follow your software's instructions exactly.
Bench Recovery: The Last Resort
Bench recovery means removing the ECU and flashing it on a bench with a chip programmer, possibly desoldering the flash chip. It's the last resort.
What it involves:
- Removing the ECU from the vehicle.
- Opening the ECU case (which may void warranties).
- Desoldering the flash chip or using a clip to connect to it.
- Reading the chip with a programmer to verify it's not physically damaged.
- Writing a known-good full ROM to the chip.
- Reassembling and reinstalling the ECU.
Recovery Decision Flow
Use this simple decision tree:
-
Does the ECU respond to OBDII?
- Yes → Try OBDII reflash.
- No → Go to step 2.
-
Can you access boot mode with the correct pinout?
- Yes → Try boot mode recovery.
- No → Go to step 3.
-
Is the ECU physically damaged or does boot mode fail?
- Yes → Bench recovery or professional help.
- No → Re-check pinout and power; retry boot mode.
For hardware requirements that support stable flashing and recovery, see the next section.
Hardware Requirements for a Stable ECU Flash
Good hardware removes most of the risk. The right interface cable, a capable laptop, and a reliable power supply do more for flash safety than any single setting.
What you need:
- A quality OBDII interface cable built for high-speed communication
- A laptop with a stable wired connection and mains power
- A smart charger that holds steady voltage
- Tuning software matched to your ECU
Frequently Asked Questions
What causes an ECU to brick during a flash?
A bricked ECU usually results from an interrupted flash process. The most common triggers are a voltage drop below the required threshold, a loose OBDII or interface cable, laptop power settings that allow sleep mode mid-write, or a corrupted calibration file. A failed checksum or an incompatible ROM can also halt the write and leave the ECU in an unresponsive state. Using a stable power supply and a verified VIN-specific file prevents most of these failures.
Can a bricked ECU be recovered?
Yes, in most cases. Recovery depends on the ECU and the tool. OBDII recovery works if the bootloader is intact. Boot mode recovery bypasses the main firmware and forces a reflash. Bench recovery requires removing the ECU and using a chip programmer, sometimes with desoldering. Success rates are high when the correct calibration file and stable power supply are used. If OBDII and boot mode both fail, a professional bench recovery is the next step.
How do I ensure a stable power supply during ECU flashing?
Connect a smart charger or power supply that holds at least 13.5 volts throughout the flash. Do not rely on the car battery alone, especially if it is older than three years. Disable laptop sleep, hibernate, and screen saver modes. Use a high-quality interface cable and avoid USB hubs. Check that the OBDII port is clean and the cable is fully seated. A voltage drop below 12 volts mid-write is one of the most common causes of a bricked ECU flash.
Can I do ECU tuning myself without risking a bricked ECU?
Yes, if you follow a strict process. Use a reputable tuning package that includes the correct hardware, such as the FlashZilla Pro or v3 bundled with H&A Midwest tunes for VW, Audi, BMW, and Mercedes. Confirm your Make, Year, Model, and Engine code before ordering. Follow the pre-flash checklist, keep the power supply stable, and use only VIN-specific calibration files. If you are not confident, a professional bench flash is safer than a rushed DIY attempt.
A failed flash can cost you a tow, a shop bill, and days without your car. The way to avoid it is boring but effective: steady voltage, a verified VIN-specific file, and the right hardware. H&A Midwest bundles the FlashZilla Pro or v3 device with every tune, delivers vehicle-specific files for VW, Audi, BMW, and Mercedes, and supports self-install from your own garage. Get started with H&A Midwest and flash with confidence instead of crossed fingers.